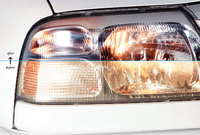
Polycarbonate headlights became popular in the 1980’s and have for the most part replaced glass headlamps on modern vehicles. They were introduced primarily to reduce weight and headlamp breakage – which can improve nighttime visibility and safety. However, as they age UV rays can cause the polycarbonate to oxidize. Making the headlamps become cloudy and crazed which diminishes light output and therefore safety. Plus, it makes them look pretty crappy.
While there are professional headlamp restoration services and DIY kits available to restore polycarbonate headlamps, this is also something you can easily and inexpensively do with a few items. You will need:
- Painter’s masking tape – the blue kind – which peels off easily
- Flannel or microfiber cloth
- Plastic Polish (like that available from Griot’s Garage)
If sanding is required, as described below, then you will also need:
- Wet/Dry Sandpaper in 600, 1500, 2000, 2500 and 3,000 grit
- Rubbing alcohol
- Paper towels
- Water in a spray bottle
- A Small Measuring Cup (one you don't use for food)
- Minwax's Helmsman Spar Urethane : Clear Gloss.
- Odorless Mineral Spirits
- Pair of scissors
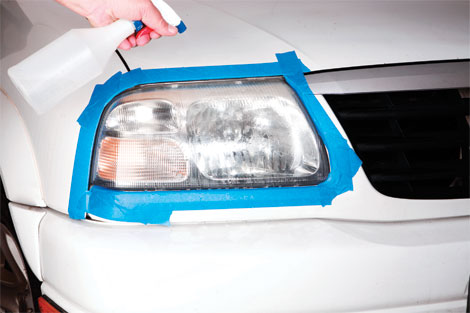
Wash the Headlights
Start by washing the headlamps off using a sponge and car wash water mix to remove dirt, dust, insects, etc. Dry thoroughly.
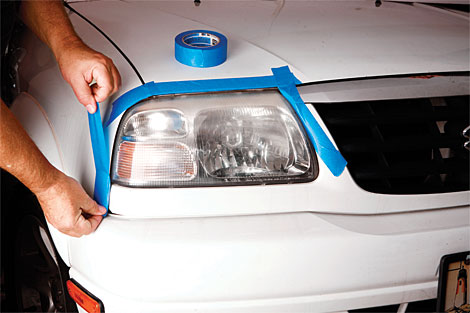
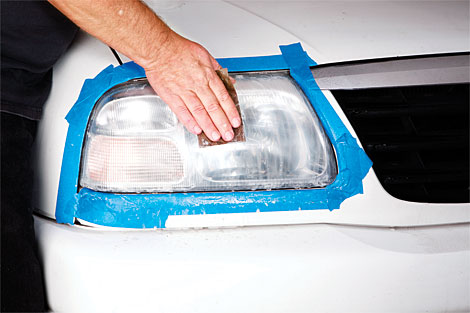
Masking Tape
Mask around the headlamps with the painter’s tape so to protect the paint, trim, etc. You may want to remove nearby trim, especially chromed metal or chrome-finish plastic, because you'll be polishing and sanding with materials that can destroy the chrome.
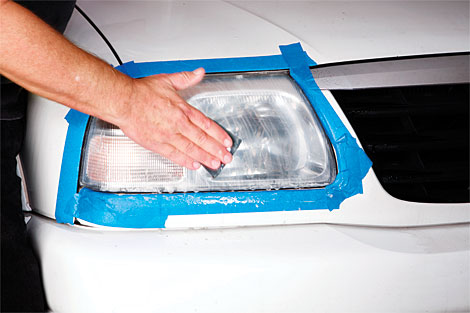
Mild Hazing
If the headlamps only have mild hazing you may be able to restore the headlamps with just polishing compound. If there is pitting and crazing you may want to just move onto the sanding step that follows. To see if polishing will do the trick try using the polishing compound applied with the microfiber cloth. Smear some compound on the lens and polish in a circular motion. As the polish gets ground into the cloth and dries out, it lifts the haziness right off the lens. Polish until the lens is shiny.
Sanding
If pitting and crazing are significant, sanding is required. Spray the headlight with the water bottle and begin wet sanding with the 600 grit sandpaper lightly sanding the lens in straight strokes. Sand the entire lens surface, always sanding back and forth in one direction. Be sure to use the water to keep the surface wet as this is a wet sanding process. Every now and then dry the surface with a towel and check the uniformity of your sanding. Now perform the same operation with 1500-grit wet/dry sandpaper, this time sanding at right angles to your previous work. Again, be methodical. Keep the paper wet, cover the entire surface and then clean up to remove any abrasive powder. Repeat the procedure, every time at right angles to the last sanding, with 2000-, 2500- and 3000-grit wet/dry. Now go back to your compound and microfiber towel (or flannel) to hand-polish out the final patina of scratches. Your lens should look shiny and clear.
Protective Coating
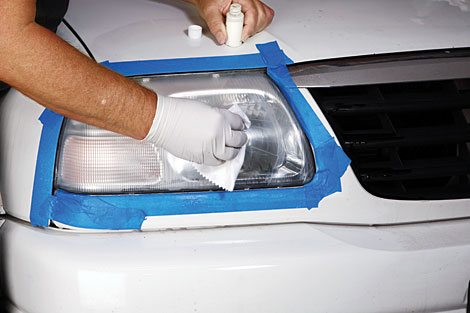
After sanding you will need to apply a protective coating of polyurethane to seal the polycarbonate and keep hazing from returning. As well it will provide a shiny finish. Pour half an ounce (or an ounce depending on how accurate your measuring cup is) of urethane into your measuring cup. Add the mineral spirits to the urethane in a 1:1 ratio (0.5 ounce urethane to 0.5 ounce mineral spirits to makes one ounce of clear coat).
Stir the urethane and mineral spirits mixture. Use a shop towel and the rubbing alcohol to wipe the headlights clean. This will get rid of any compound left on the headlights. Take a shop towel and fold it into a small square. Dip the towel into the urethane mixture and make sure to get rid of any excess urethane from the towel. Be careful not to drip the clear coat the paint. Begin applying, starting at the top of the headlight and going in a horizontal movement, and work your way down. Use the tape as guides, making sure you follow through with each stroke. Make sure you apply a thin and even coat, making sure there are no runs.After applied, the clear coat will begin to quickly thicken, so try not to make mistakes. If you do, the clear coat will come off with mineral spirits. Just wet a shop towel with the spirits, remove the clear coat, and start over.
Let the clear coat dry for 30 minutes before driving. DO NOT TOUCH THE HEADLIGHT. The layer under the top is still wet. To be safe, let the clear coat sit for at least 4 hours before touching the headlight, or driving. Letting it dry overnight is best. It is suggested to not wash the car for at least a day, and if so, wash it by hand. Urethane takes time to cure. Leaving it out in the sun is helpful. After about three days of sun exposure and curing, you are safe to wash the car as normal.